
Edgium / Documentation / CDN onboarding
Edgium CDN onboarding: from first sign-in to a live site on HTTPS
You have signed up for the Edgium CDN and want your site running behind it, with the HTTPS padlock. This guide takes you by the hand, without hurry and without loose jargon, from the first panel sign-in to the address opening securely. We will use one example from start to finish: the store example.com, which wants to put www.example.com behind the CDN.
The screenshots come from a test environment, with fictional data.
Before you start: what to have at hand
There are three things, and none is hard to find.
- Panel access. Accounts are created by the Edgium team. If you have not received your access yet, use the contact form.
- Access to the domain DNS. It is the panel of the registrar (where you bought the domain) or of the provider that handles DNS today. You will create a record there, or switch the nameservers.
- The public IP and port of the site server. It is the origin: the server the CDN fetches content from. The panel asks for the IP number, not the server name.
Example. The store example.com has its site on a server with a public IP and the domain at the registrar where it was bought. That is all it needs to start.
The visitor's path: what the CDN does for you
What it is and who it is for. The CDN sits between whoever visits your site and your server. It is for anyone who wants a faster site, protected from attacks and with HTTPS, without touching the server. The visitor only talks to the CDN: it answers with the stored copy when it has one, and only goes to your server when it must. The WAF, the CDN firewall, looks at every request before that and stops the ones that look like an attack.
- visitor request
- answer to the visitor
- fetch from the origin
- attack stopped
Scroll the diagram sideways to see it all.
What the animation shows, in order:
- The visitor of
www.example.comasks for the page. The request reaches the CDN and goes through the WAF first. - If the CDN already has a copy of the page in the cache, it answers at once, without bothering your server.
- If it does not, the CDN fetches it from the origin, delivers it to the visitor and keeps the copy for the next ones.
- A request with an attack pattern, such as an SQL injection, stops at the WAF and never reaches the origin.
1. Sign in to the panel
What it is. The panel is where you add domains, turn HTTPS on and follow traffic. It lives at secure.edgium.net.
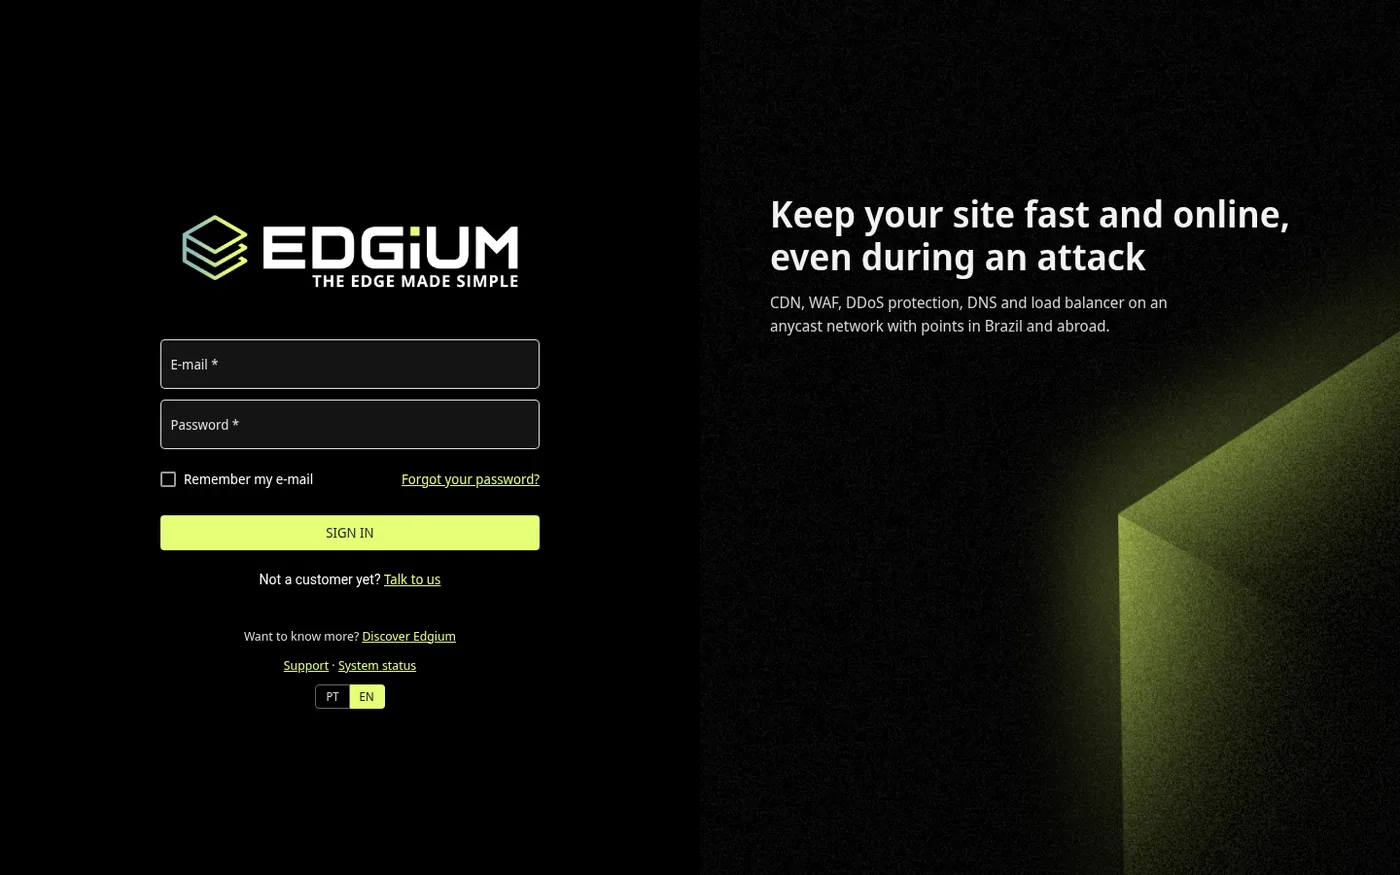
What to do. Open the address, type your e-mail and password and sign in. If you forget the password, use Forgot my password. Anyone who is not a customer yet finds the Talk to us link on the same screen. The panel speaks Portuguese and English: use the PT | EN switch.
Want to see the panel from the inside before moving on? Read the panel guide.
2. Add the domain
What it is. The domain is your business name on the internet, like example.com. Adding it tells Edgium which name you will manage here. This step only registers the name: nothing changes on your site yet.
What to do. On the Dashboard, click ADD DOMAIN. Type the domain without http:// and without www. The "Account domains" list shows each domain with the DNS and CDN shortcuts.
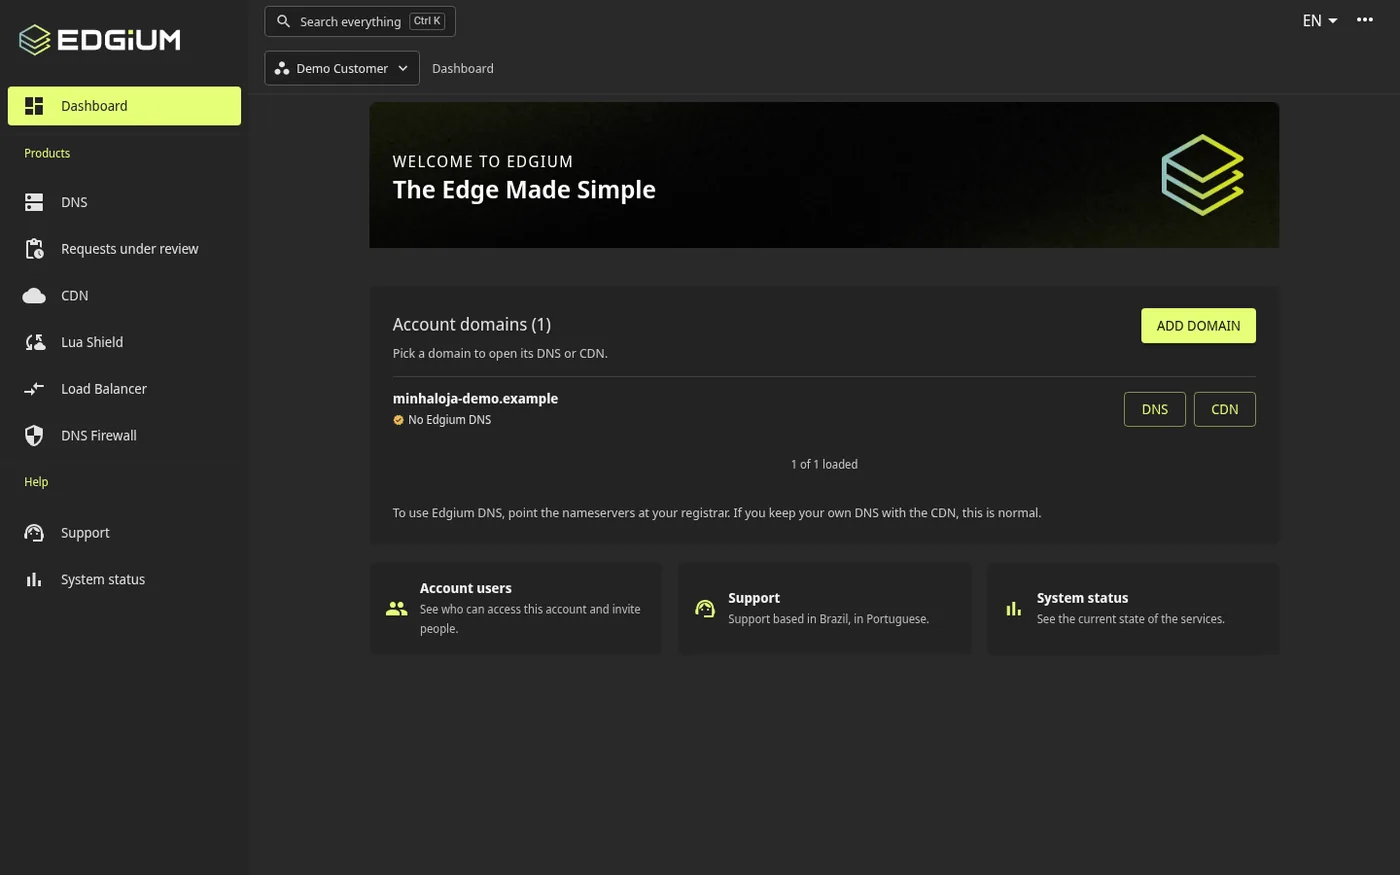
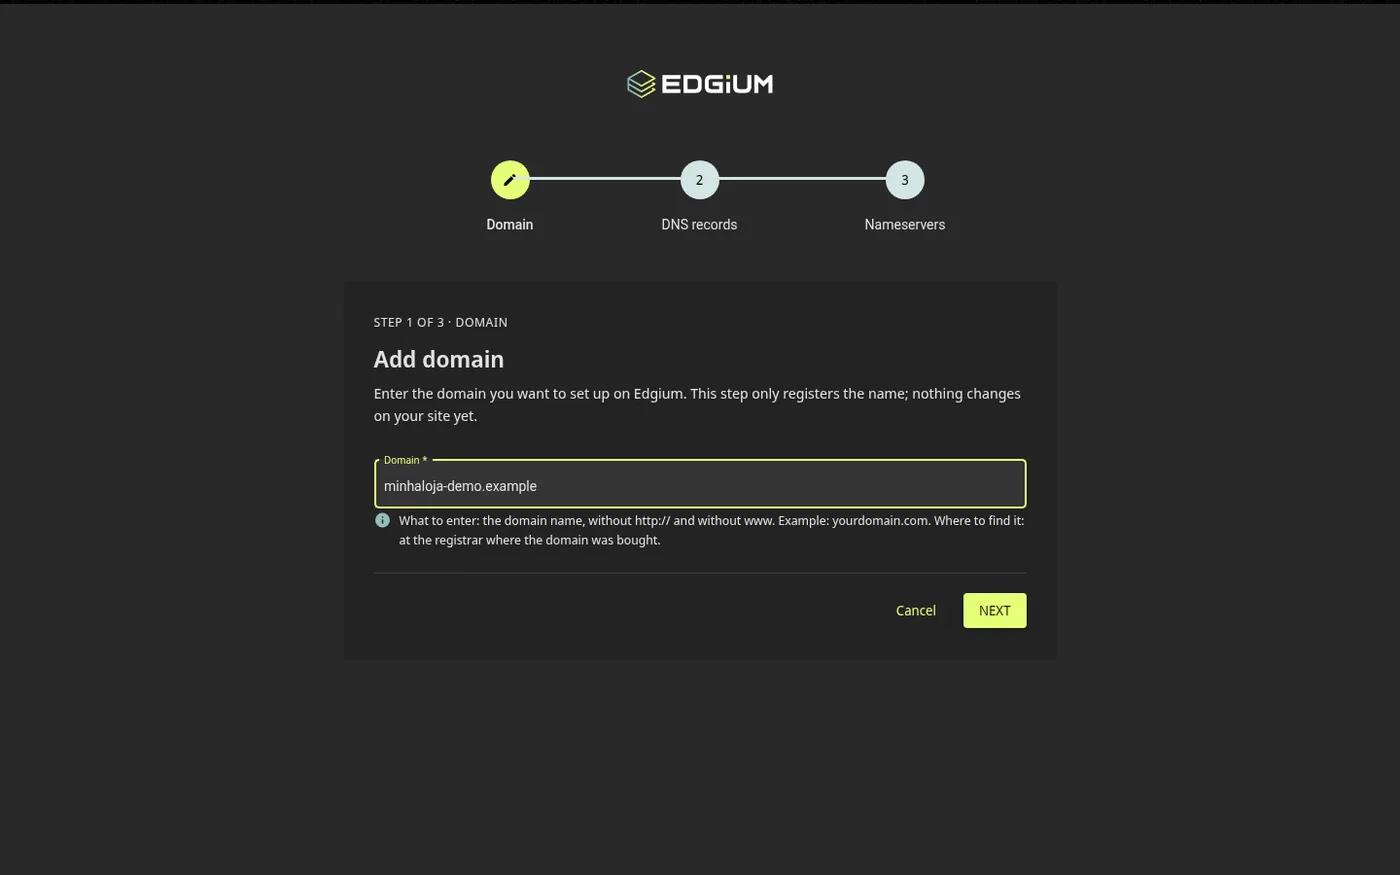
The wizard has three steps: Domain, DNS records and Nameservers. They apply to anyone who wants DNS on Edgium, as you will see in step 4.
If the panel refuses. When the domain cannot be added right now, for example because it is already in another account, the panel says "This domain cannot be added right now. Contact support and give them the code" and shows a code that starts with DOM-. Do not try again: write to support with the code. The request stays under Requests under review and you get an e-mail when there is a decision.
3. Prove the domain is yours
What it is and who it is for. Before putting a domain on the CDN, Edgium has to be sure it is yours. It is a protection for you: nobody can put your name on the CDN on someone else's behalf. The proof depends on where the domain DNS lives.
- you act
- ownership proven
Scroll the diagram sideways to see it all.
What the animation shows, in order:
- DNS on Edgium: you switch the nameservers of
example.comto Edgium's. When they answer for the domain, ownership is proven. No TXT needed. - DNS outside Edgium (CDN only): you publish in your current DNS a TXT record the panel shows. Edgium checks it and ownership is proven. This is asked for only once.
With DNS elsewhere, what to do. When you create the CDN for a domain that does not use Edgium DNS, the panel opens the Confirm that this domain is yours window. Follow its three steps: open the panel where the domain DNS is managed today; create the TXT record with the name and content shown (each has a copy button); and click VERIFY AND CREATE when the record appears. It can take a few minutes.
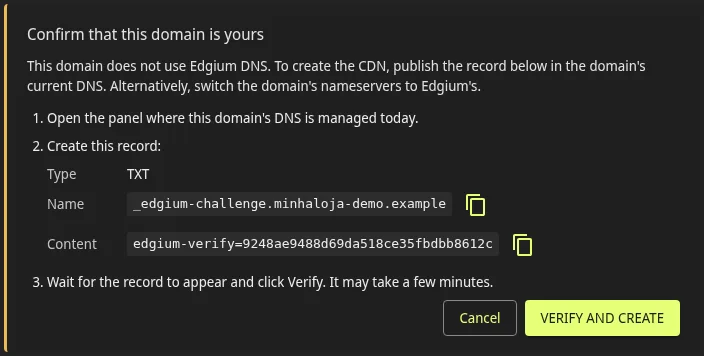
If the panel says it did not find the record, check that the name was created exactly as shown and try again after a few minutes: DNS propagation can take a while.
When the domain is already in a validated account of yours, its subdomains, like www and shop, go through without asking for the TXT again.
4. Take care of DNS: bring it to Edgium or point the record
What it is and who it is for. DNS is the service that says where your site is. You choose between two ways. Bringing DNS to Edgium is for anyone who wants to handle everything in one panel, with the anycast network and a change history. Keeping DNS where it is is for anyone whose DNS is already in good order and only wants the CDN in front of the site.
Option A: bring DNS to Edgium
Continue in the wizard. In the DNS records step, Edgium looks in the current DNS for the common records (www, mail, SPF, DKIM and others) and shows what it found. Check the list and add what is missing, so the site and e-mail do not stop after the switch. The list may be incomplete, because DNS does not allow listing every name: compare it with the current zone. Then, in the Nameservers step, switch the domain nameservers, at the registrar, to the two the panel shows (Primary and Secondary, each with a Copy button).
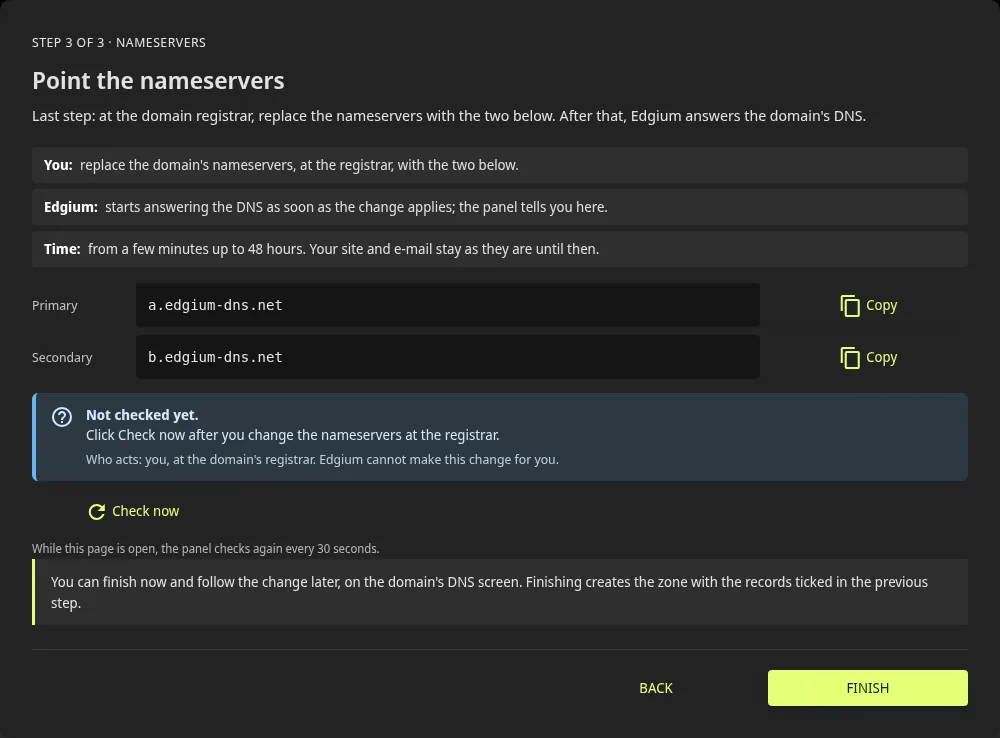
The switch takes from a few minutes to 48 hours to apply everywhere, and your site and e-mail stay as they are until then. The panel checks by itself, every 30 seconds while the page is open, and you can also click Check now. When the nameservers apply, ownership of the domain is proven and the zone starts answering.
With DNS on Edgium, the subdomain record is created on the domain DNS Zone tab, with a review before saving and the Undo button.
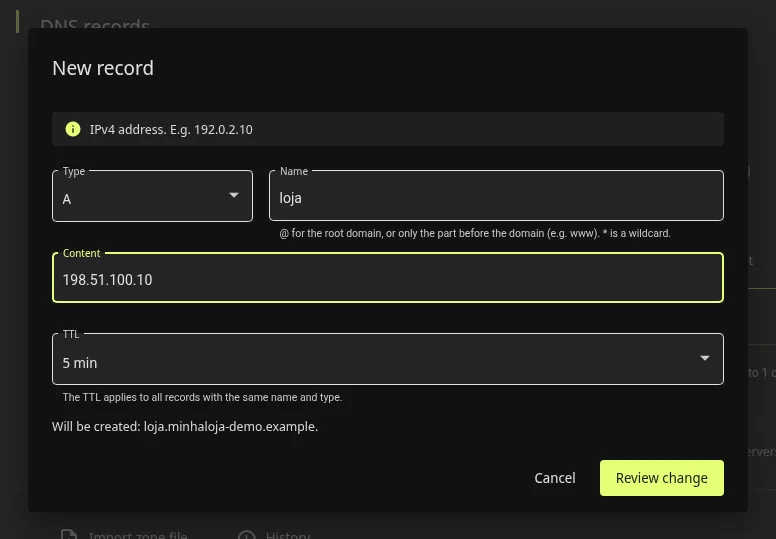
For the full managed DNS walkthrough, with zone import, DNSSEC and best practices, read DNS management and DNSSEC.
Option B: keep DNS where it is
Here you do not switch any nameserver. When the domain stays without Edgium DNS, it shows with the No Edgium DNS badge and the panel says: "To use Edgium DNS, point the nameservers at the registrar. With the CDN on your own DNS, this is normal." Ownership is proven by the TXT from step 3, and the pointing is an A record the panel shows, with the exact value, in step 3 of the activation (see step 6 of this guide). You create that record at the provider where DNS lives today.
If you already added the domain through the wizard and now prefer to keep DNS elsewhere, the domain DNS screen has the Edgium DNS switch. When off, the domain stays without Edgium DNS. The panel asks for confirmation, because the zone records on Edgium are lost.
5. Add the subdomain and the origin
What it is. The subdomain is the address that will go through the CDN, like www.example.com. The origin (the panel also says upstream) is the server where the real site lives.
What to do. In the panel, open CDN, choose the domain and click Add subdomain. Type only the part before the dot (www). To use the domain without a prefix, tick Root domain. Then enter the origin server: name, public IP, port and priority. Keep Enable on creation ticked, check the summary and click CREATE SUBDOMAIN.
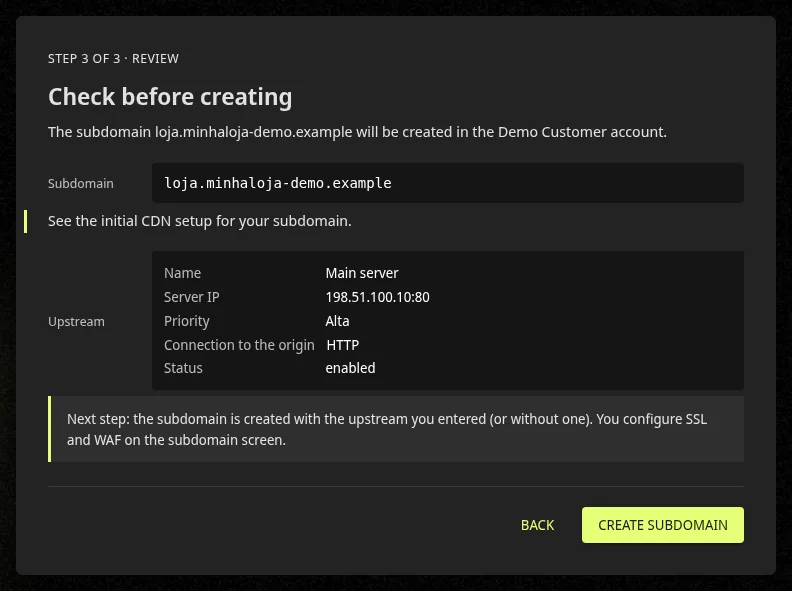
Use the public IP of the server. Every detail of the wizard is in the panel guide.
6. Follow the 8-step activation
What it is. After it is created, the subdomain goes through 8 steps until HTTPS is active. The panel shows which one it is in, what is already done and who acts now: you or Edgium. You do two steps. In a subdomain created from November 6, 2026, the certificate and HTTPS are automatic.
- you act
- Edgium acts
Scroll the diagram sideways to see it all.
What the animation shows, in order:
- Site registered: what you did in the previous step.
- Sending to the network: Edgium publishes the configuration on the servers. It usually takes up to 30 minutes.
- Point your DNS: you create the A record the panel shows, with the Copy button. If DNS is on Edgium, the record is created in the DNS Zone.
- DNS validation: Edgium checks by itself, every 5 minutes. You do not need to tell us.
- Certificate, network and HTTPS: Edgium requests the free certificate (Let's Encrypt), waits for it to reach every server on the network and only then turns HTTPS on, with the redirect from http to https.
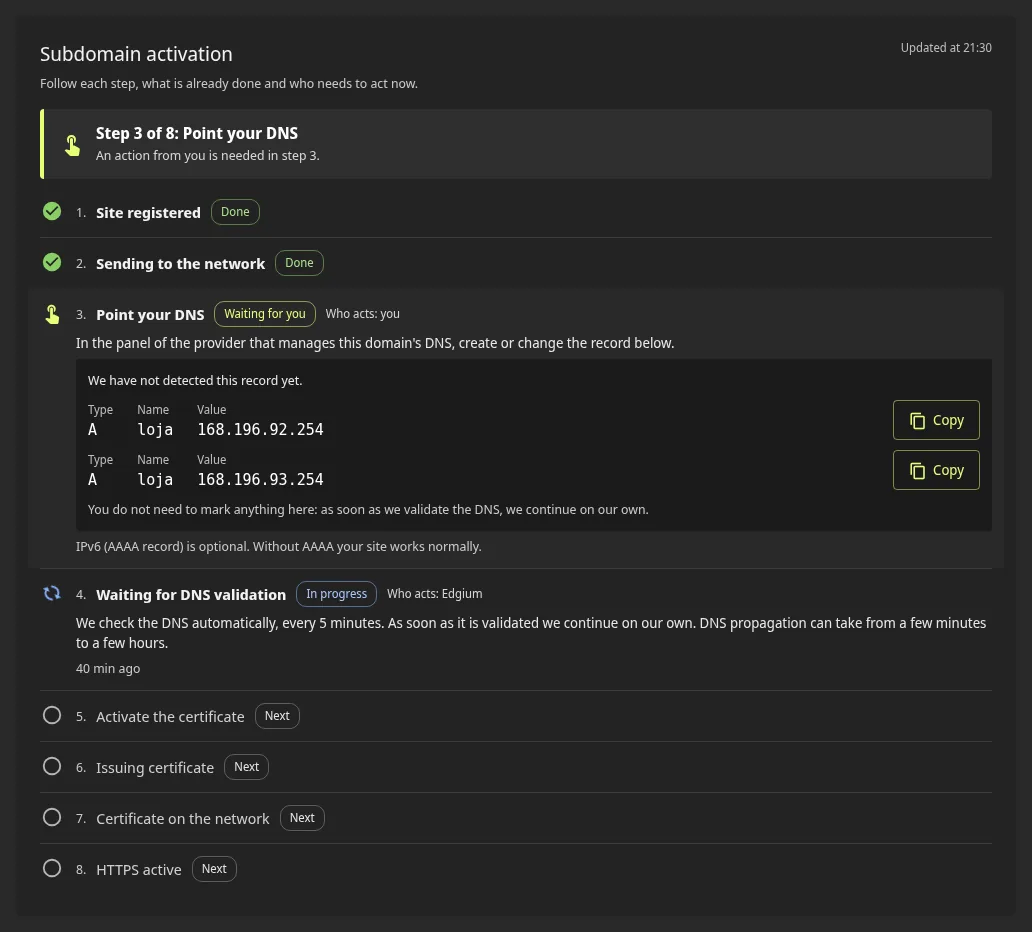
Why it can take a few minutes. HTTPS only turns on with the certificate published and confirmed at every point of the network. So, after the certificate is issued, step 8 may show "We are publishing HTTPS on the network." for a few minutes. That is normal.
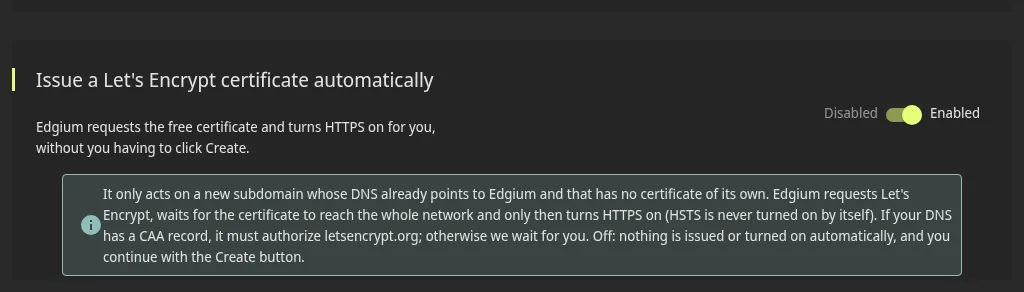
Prefer to do it by hand? On the SSL tab there is the Issue Let's Encrypt certificate automatically switch. When off, nothing is issued or turned on by itself, and you go through the Create and SSL activation buttons. If your domain has a CAA record that does not authorize letsencrypt.org, the panel warns you and you add the authorization to your DNS; Edgium tries again by itself. HSTS is never turned on unless you ask.
Watch the video (1 min 45 s)
Each step, with screenshots, is in the subdomain activation guide.
7. Check the WAF and Analytics
What it is and who it is for. The WAF protects your site from common attacks before they reach the server. Analytics shows how the site is being delivered. Both are for anyone who wants to know the site is protected and that they can see what happens.
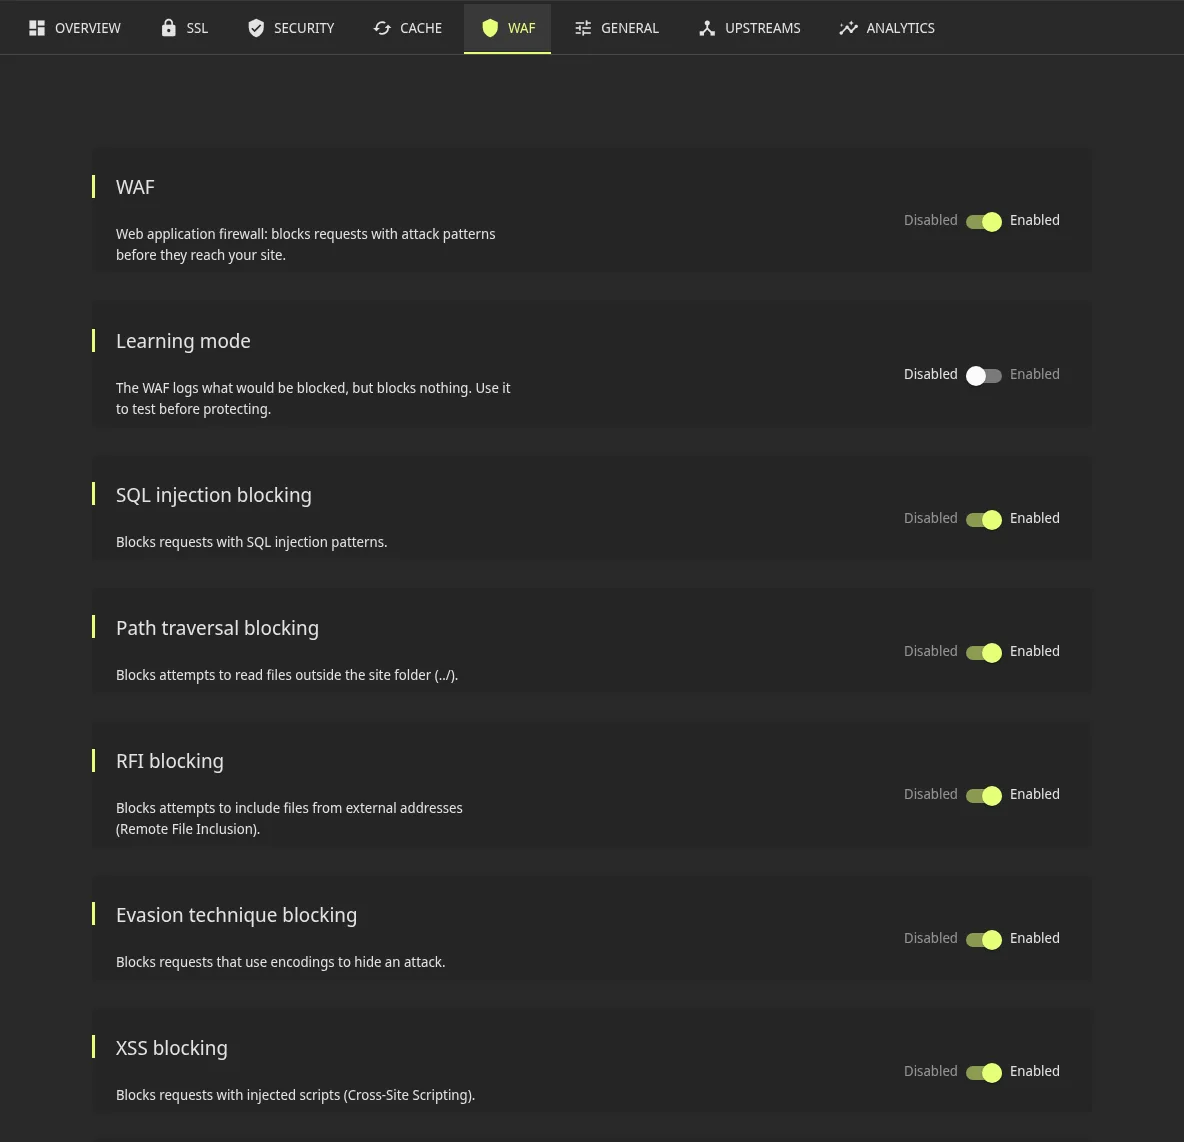
WAF. Open the subdomain WAF tab. It has the general WAF switch and the blocks by attack type: SQL injection, Path traversal, RFI, Evasion technique and XSS. Check that the WAF is Enabled. The Learning mode logs what would be blocked without blocking anything: it is for observing before protecting.
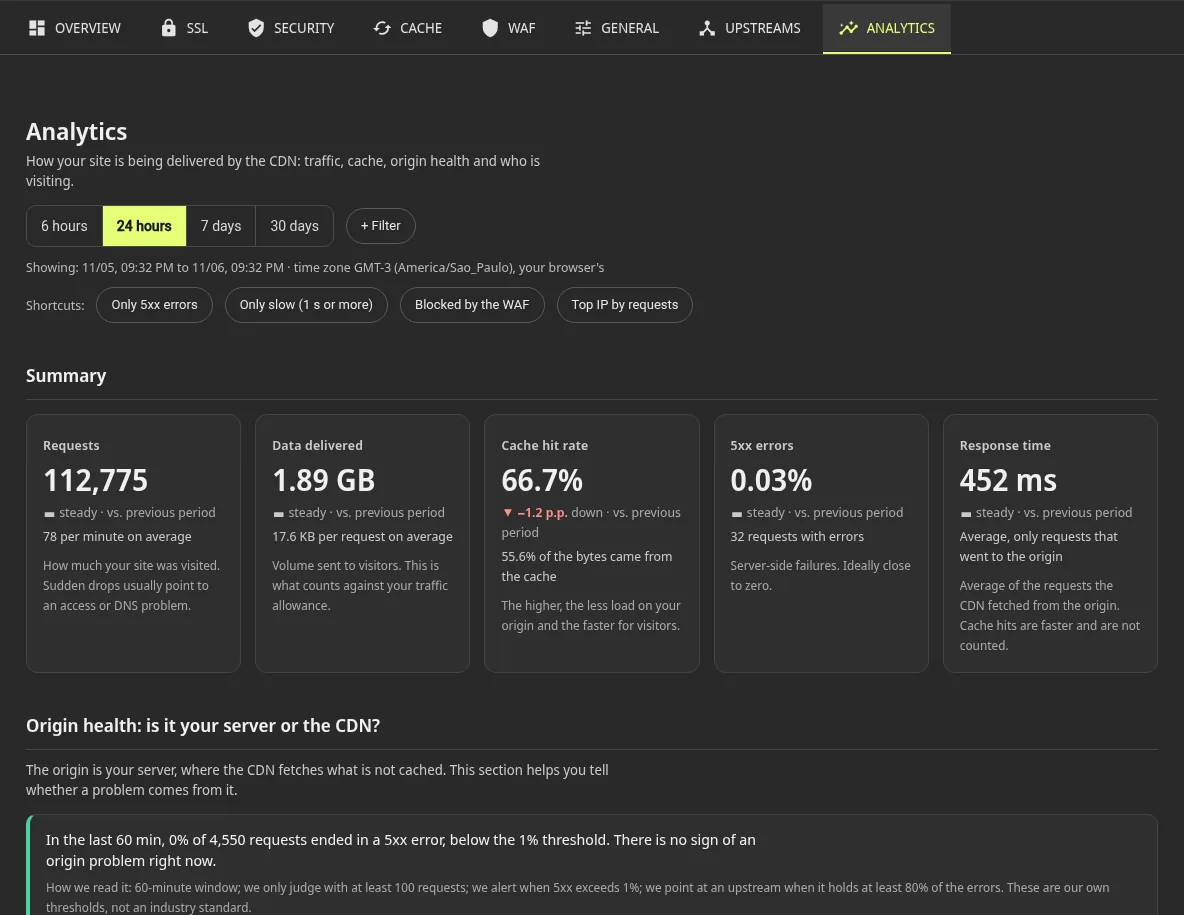
Analytics. On the Analytics tab, the Summary shows requests, data delivered, cache rate, 5xx errors and response time. The Origin health section answers the most useful everyday question: is the problem your server or the CDN? The numbers appear as visitors arrive.
To read the 502, 503, 504, 499 and 4xx errors, see Analytics and WAF logs.
8. Confirm it worked
Go back to the Overview tab. When everything is ready, the panel shows All set: HTTPS active. Open https://www.example.com in the browser and check the padlock.
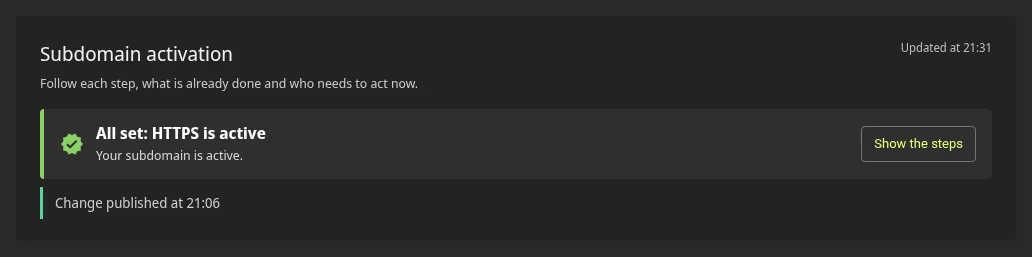
The example.com store finished onboarding: visitors open the site through the CDN, on HTTPS, and the store server stays hidden behind it.
If you get stuck, ask for support
Start with the manual for your topic: the documentation center gathers them all. If that does not solve it, write to suporte@edgium.net. On the support page you see what to check first and what to send (the site address, the time, the provider and screenshots), so the answer comes sooner.
Frequently asked questions
How long until the site is live on HTTPS?
It depends on you and your DNS provider. DNS propagation takes from a few minutes to a few hours. Once the DNS is validated, the certificate and HTTPS come by themselves and can take a few minutes.
Do I need to move my DNS to Edgium?
No. You can keep your DNS where it is and just point the subdomain to the CDN. In that case Edgium asks for a TXT record, once, to prove the domain is yours. Moving the DNS is your choice.
Do I have to request the certificate and turn HTTPS on?
Not in subdomains created from November 6, 2026: Edgium requests the free certificate and turns HTTPS on after the DNS is validated. If you prefer to do it by hand, use the switch on the SSL tab.
What if the panel says the domain cannot be added right now?
The message carries a code that starts with DOM-. Write to suporte@edgium.net with that code. The team reviews it and e-mails you; the request shows under Requests under review.
Where do I ask for help?
Read the manual for your topic first, in the documentation center. If that does not solve it, write to suporte@edgium.net with what the support page asks for.
Do not have panel access yet?
Accounts are created by the Edgium team. Tell us your domain and we will prepare access and a test with your site.